Welcome 👋 
If you’re looking to build an app, you’ve come to the right place.
If you’re looking for all the steps involved in building an app, from ideation to user retention long after the app is launched, you’ve really come to the right place.
In this guide, we’re going to walk through the step-by-step process for bringing to life a well-thought-out, well-designed, well-built mobile app that your future users will love.
Here’s what you’ll learn:
- How to refine your idea 💡
- How to outline your strategy 📝
- How to plan the UX & UI 🖌
- How to build the app 🔑🔑🔑
- How to test your app 🔍
- How to launch like a pro 🚀
So if you’re ready to turn your mobile app dream into a reality, this is the guide for you.
Let’s get started.
What to expect from this guide (and how to use it)
Before we dive in head first, let’s clear up what you should be expecting from this guide.
First things first, this guide is hefty.
To give you some context, it’s about 15,000 words and it’ll take ~1 hour to read from start to finish. (Don’t panic though—you can easily jump between sections to find the info you’re looking for.)
This guide is not your typical “how to build an app by the end of the day” click-bait blog post that’s just copy/pasted nonsense from another click-bait post. It’s also not focused solely on the development side.
Our goal for this guide is to help you navigate the entire mobile app building process, from validating your idea all the way to launching your app—and beyond. Which leads us to the big question:
How many steps are there?
Short answer: 9
Long answer: 9+
This guide includes 9 overall steps, but most of them are broken down into “sub-steps.” For example, one of the steps is “create your mobile app strategy”. As we’re sure you can guess, there’s a lot involved in creating a strategy, so we’ve broken it down into smaller chunks.
To get the most value out of this guide, we first recommend that you bookmark this page. (We’ll wait.)
…
…
…
Then skim the sections to get a feel for the major steps before diving into the details and getting to work. Come back to this guide often as you go through the app-building process.
We can’t stress this enough—you absolutely do not need to read this guide in one sitting. Bookmark it as a reference you can continually return to!
And with that, let’s roll.


At MindSea, our timeline is typically three months from starting a project to getting the app approved and launched in the app store. It’s a three-phase process to go from discovery to launch—and that’s what we’ll be walking you through in this guide.
Phase 1: App Planning & Discovery (4 Weeks)
Our app planning process is built on three key elements: (1) strategizing your app experience (2) crafting the user experience and (3) creating a solid product roadmap. We call this process the Mobile App Blueprint, and it can be a blueprint for your own app build.
Here’s what it looks like:
Strategizing Your App Experience
During the strategy portion of creating a blueprint, we work with clients to establish a clear timeline by understanding their circumstances. We introduce ourselves to the client’s internal mobile development team and confirm project expectations. Then we hold a workshop to discuss business goals, target audiences, priority features and insights that will help you create an app that is more likely to find product-market fit.
Crafting The User Experience
Just as no one would attempt to build a house without a blueprint, we don’t think you should try to build an app without a blueprint either. That’s why we craft a user experience that is so close to completion, it can be passed to any developer for implementation. Our deliverable at this stage is an architecture that consists of a defined user journey, sketches of the experience screen by screen, high-fidelity mockups, and a working prototype that you can test and demo.
Creating A Solid Product Roadmap
Once designs are completed, we provide clients with detailed technical requirements and UX documentation that any experienced mobile team can work with. This product roadmap arms clients with everything they need to build their app, including the info they need to set budgets for the short and long term.
To this point, two key reasons the process has gone smoothly, without delays and scope extensions, are timely approvals and consistent collaboration.
Phase 2: Mobile App Development (2+ Months)
Once the research, designs and roadmap are out of the way, it’s time for the build. The development phase takes place primarily on our end with very little work for clients—the developers and programmers use this time to write code and create a great app experience.
The length of the development phase depends on the app’s complexity per the roadmap from phase one. If your app is mostly for information purposes and only offers a few interactions, it might be built in less than a month. A more complicated app with an inventory, geo-location, social logins, dynamic content and a user database could take double or even triple the effort—and therefore time.
Prior to going live in the app store, we give teams a chance to demo and test the app. We’ll conduct quality assurance testing, squash bugs and make any final design adjustments that make sense for the app’s audience.
Phase 3: Maintenance, Support & Updates (Ongoing)
Once the app has been developed, approved by the app store and downloaded by real people, it’s time to pop a bottle of champagne, sure—but it’s also time to keep things moving in the right direction. This is when you determine which features to build next and implement ongoing testing to keep the app working correctly.
To help plan for this part, the roadmap we deliver in phase one outlines specific features and updates that can be developed in the months following the launch.
Remember: The timeline we’ve shared here is solely based on our own experience with typical clients. Some apps don’t require much design and development work because the client already has the assets. If you’re interested in getting a rough estimate of how much time it would take for our team to help you bring an app to life, get in touch.

Navigate this section
Find an idea worth pursuing
Not all ideas are good ideas. When it comes to your idea for a new app, the key is making sure you’re creating something that the market is actually asking for. This is where you answer the questions: Who? What? When? Where? Why?
Before you even start thinking about design, product roadmaps or launching, you have to make sure you’re not chasing an idea that no one but you wants.
You likely fall into one of two buckets:
- Established companies thinking about adding a mobile app to the mix
- Entrepreneurs and makers who want to bring an idea to life
And the process for finding (or validating) a mobile app idea looks slightly different depending on where you sit.
If you’re an established company:
Check Google Analytics to see what devices your ideal buyers are using. If buyers are already accessing your site on their phones, then a mobile app could improve their user experience.
Then, make a list of the tasks that will help your users get past a pain point or solve a problem.
“The steps a user is willing to take to solve a problem has dramatically changed in the last few years though. Three years ago you’d never book a flight, open a bank account or apply for a mortgage on a mobile device, but good UX has completely changed that.” —Reuben Hall, CEO at MindSea
Compare these tasks with the advantages a mobile app typically brings:
- Speed—an app is 1.5x faster than a website
- Personalized onboarding
- Instant online and offline capabilities
- Contextual experiences
- Push notifications
- Simplified design
- Productivity improvements and cost reduction
- Interactive engagement in-app
- Integrations with mobile features (e.g., camera, GPS, fingerprint sensor)
If your ideal buyers are already on mobile, and an app would be well-suited to the tasks they want to complete, then you might just be onto something.
If you’re an entrepreneur:
You don’t have the data an established company does, and you don’t have a group of existing customers you can look to for insights.
Keep in mind: A lot of entrepreneurs looking to build an app fall into the idea-hunting trap.
“Don’t search for ideas. Identify problems and find the best way to solve them.” —Reuben Hall, CEO at MindSea
If the only thing supporting your app idea is that you think it’s cool, then that idea doesn’t really have a leg to stand on.
Don’t just hunt for a new idea. Hunt for a problem you can solve.
You may already have a few in mind. If so, that’s great—write ’em down. If not, do your research on what’s already out there. Our own Amanda Somers outlined a few great questions to ask yourself:
- Do I want to expand on an existing app?
- Do I want to build an entertainment app?
- Is there a mundane manual task I could speed up?
- Could I design an app to make someone safer?
- Could I design an app to improve certain habits?
- Could I improve people’s health?
- What is a common problem that people are solving in an inefficient way?
Do your research, ask your target audience how they solve the problem today, then ask if they could see an app replacing that solution.
“Keep an app idea journal. Make it a point to write down something at least once a day. It can be a simple or a complicated one. New ideas will branch off older ones and you’ll naturally come up with ideas you may not have considered initially.” —Amanda Somers, Product Designer at MindSea
Don’t be afraid to share your ideas
We get a lot of calls from app startup founders. Some are at such an early stage in their business, all they have is their concept.
But there’s a problem—they’re scared to actually share their idea with us.
That’s probably one of the biggest trends in our daily conversations with mobile entrepreneurs: They’re afraid that someone else might steal their app idea and run with it.
Because of that, their first question is usually ‘Will you sign an NDA?’
But here’s the thing:
You should never be afraid to share your app idea.
In fact, you should tell it to as many people as possible, especially app-building pros like the ones on our MindSea team.
Why?
Here are our top five reasons for why you absolutely should share your ideas:
1. Your idea isn’t as novel as you think
We can’t tell you how many times we’ve heard the same idea twice in one day.
There are macro trends in app startups every year. You may think you’ve got something brand-new, but your idea is probably a response to market forces and realities experienced by everyone, not just you.
Even ideas that are wildly successful aren’t necessarily new.
Instagram has over a billion monthly active users, but it wasn’t the world’s first photo and video sharing mobile app, nor was it the last. Snapchat is essentially the same idea delivered in a different way; so is TikTok.
Chances are that right now, someone out there is working on the exact same idea you are. That doesn’t mean you should give up now and stop pursuing your dream, but sharing your idea might reveal competition you weren’t aware of and help you meaningfully differentiate your app.
2. An idea isn’t an execution
The execution part is much, much harder.
Think about all the elements that go into a successful business—from marketing to management to finances, there’s so much more to a business than your idea. Your execution is what makes your idea succeed, not the idea itself.
Take your go-to-market strategy, for example. Without a good one, even the best of mobile app ideas could flop. A great marketing plan sometimes costs more to execute than the app development itself, but the ROI can also be game-changing.
3. We’re too busy to steal your idea
No, seriously—we’ve got too much on our plates already. It’s not that your idea isn’t amazing. It very well might be. But we know how much work you’ll have to put in to bring your idea to life, and we’ve got our own business to handle.
4. An idea gets better the more you share it
You might be thinking you have to protect the validity of your idea at all costs. The truth is, you should be actively trying to destroy it.
Testing the viability of your idea helps you identify flaws and fix them.
Tapping mobile app pros for their feedback can only help you shape your idea for the better. (If you need an ear, reach out to a MindSea product strategist—we’re always up for a chat.)
You should talk about your idea everywhere you go in order to gauge public interest. And when you encounter a naysayer, view it as a learning experience. How can this criticism make your idea more solid? How can you improve your value?
Besides, how are you planning to sell your fully built app to users if you can’t even sell your idea?
5. Your idea will change
Finally, the most important thing to remember is that there isn’t a single successful app out there that hasn’t gone through multiple iterations of its core features.
App companies introduce better experiences and functionality all the time. Some even revamp their entire user experience to meet new realities.
Think about how different Uber is now from when it launched—right down to its app icon.
Sure, Uber’s core idea is the same, but the experience has gotten smarter in ways the company probably couldn’t have imagined back when the app was just an idea. Estimating arrival times, learning your routines, integrating with your personal calendar—these incremental improvements are all a result of ongoing feedback.
Your original idea might not even be recognizable by the time you’re able to look back and say, ‘Wow, this really worked.’
How to avoid wasted time & resources on bad ideas
Companies design and develop new products every day, only to come to the harsh conclusion that nobody wants what they’re offering.
Sadly, this realization often comes too late—after the product has already launched and loads of resources have been spent.
If that sounds like a nightmare to you…ditto.
Enter: the RAT.
The goal of the Riskiest Assumption Test (RAT) is to validate your product, customer and business model before you spend time and money building something that flops.
While the RAT doesn’t guarantee success, it gives you much better odds.
Assess whether your business & app are viable
Startups using the MVP (minimum viable product) model often begin by building their product, which may or may not have product-market fit. An analysis of 101 startup postmortems found that 42% of startups fail due to lack of product-market fit:
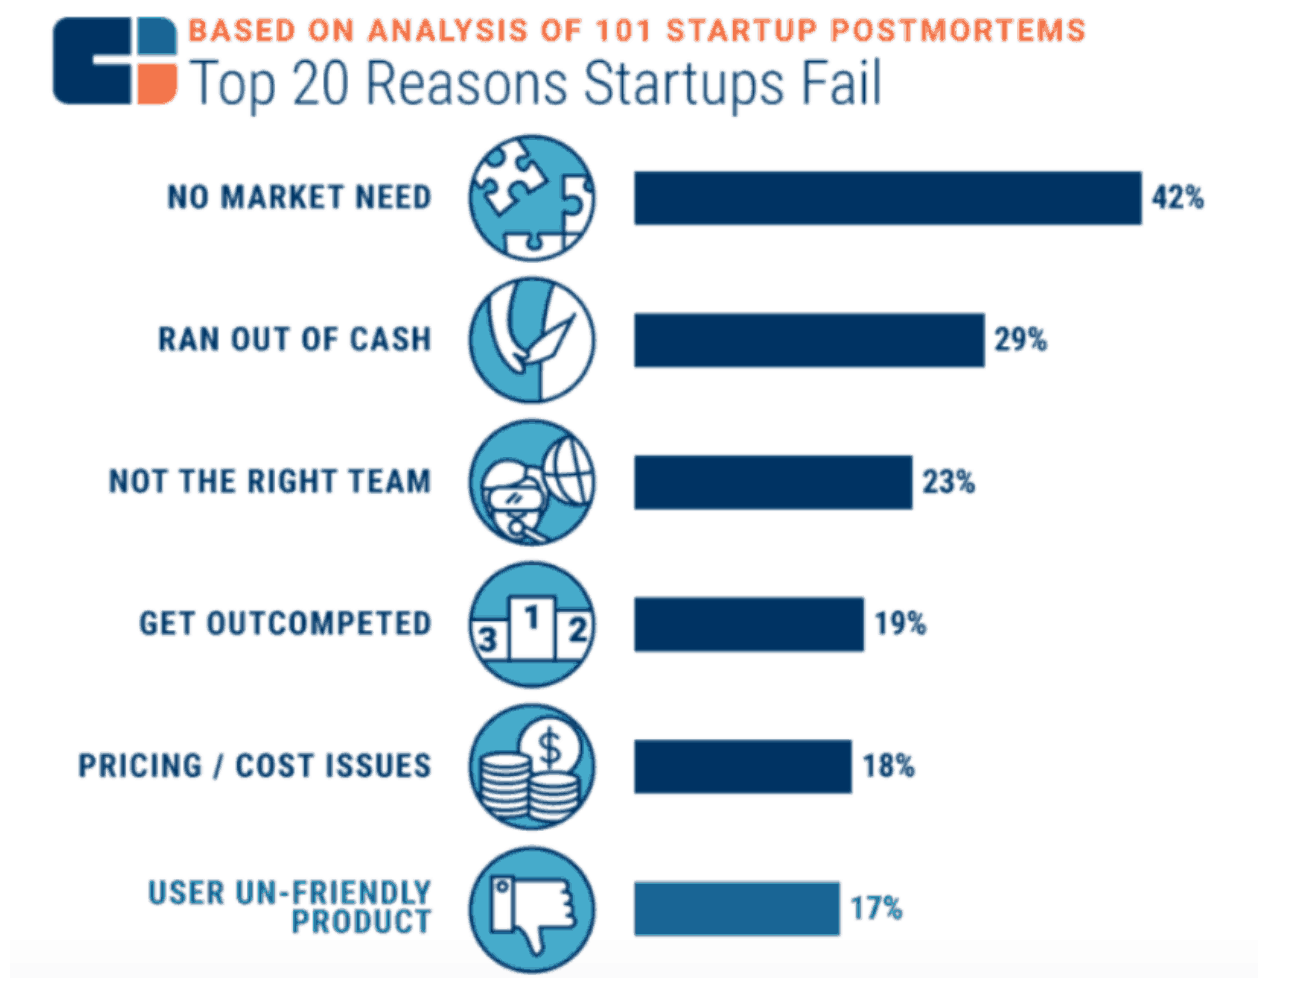
The RAT enables you to test whether your product and business model are viable before launching your product in order to avoid this common pitfall.
In the beginning stages of product development, the RAT is used to help with discovery brainstorming using the learn-measure-build feedback loop:
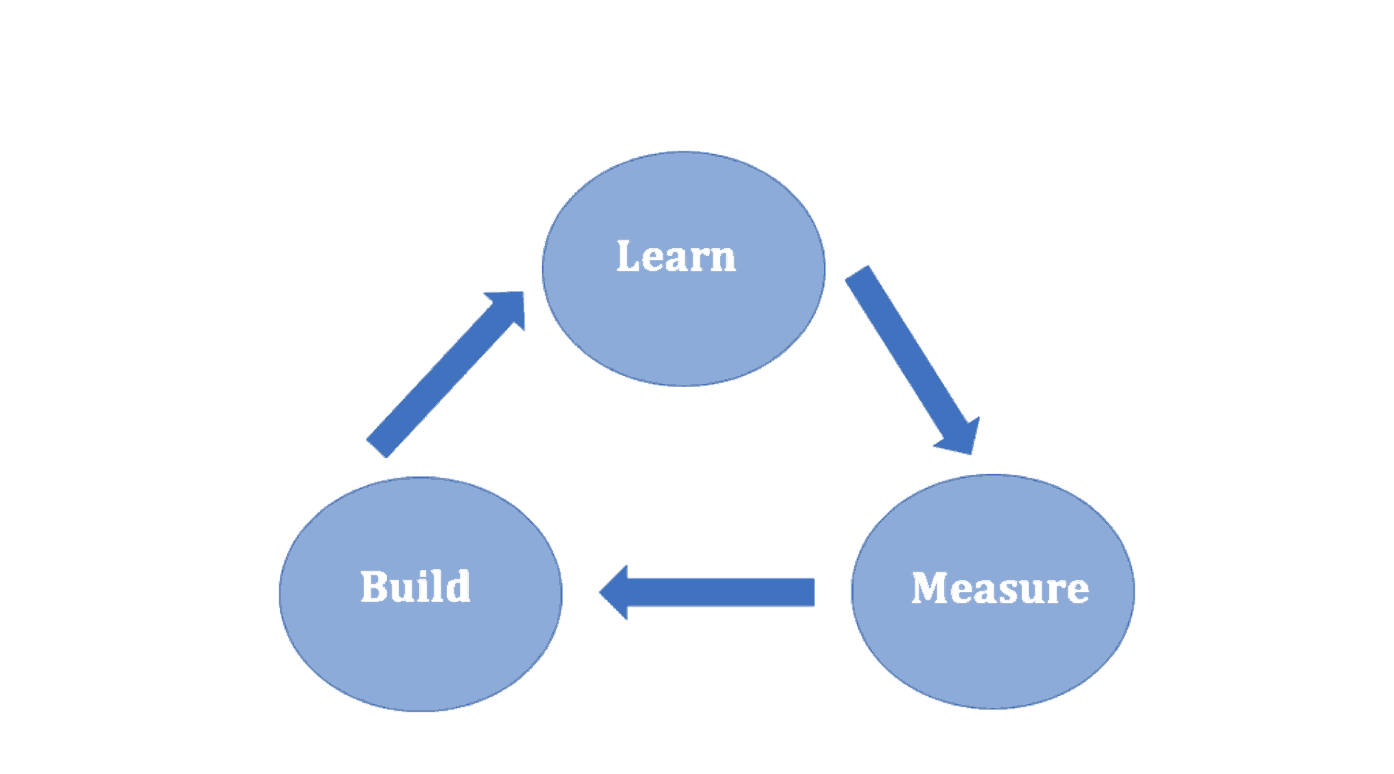
The RAT process looks like this:
- Learn and gather data through experiments
- Measure data collected
- Build product
- Learn and gather data through experiments
- Measure data collected
- Iterate
And so on…
Let’s say you want to build a video editing app for millennials. In the learning phase, you conduct customer interviews and gather data on different use cases or edge cases.
After doing so, here are a few questions that you should be able to answer:
- Is this a perceived problem for your customers?
- How does your product help them solve their problem?
- Is this product something that they would be willing to pay for? If so, how much?
- Is the market big enough?
Testing your assumptions can help you determine whether your product meets your target customers’ needs or if it’s better suited for another segment of the market. Maybe your product can be used to solve a different problem altogether, or maybe there is no fit at all.
Per Lean Startup Machine, an effective experiment has four elements:
- Hypothesis
- Riskiest assumptions
- Methods
- Minimum criterion for success
In this scenario, the hypothesis would be something like:
Millennials have trouble editing their videos for social media because they do not have an easy-to-use app.
The risky assumptions you’re testing might be:
- Users are frustrated enough with current apps that they would pay for a better solution.
- Users would be willing to pay $5.99/month for an app.
Your methods for this experiment could be gathering signups to gauge early interest and conducting online surveys.
The minimum criterion for success is a benchmark for assigning a pass or fail rating to your experiment, like this:
For this product to succeed, it’s necessary that we receive 100 early signups out of 500 landing page visitors in the next two weeks.
If the experiment passes, then your product team starts building. If the experiment fails, then it’s back to the drawing board. The RAT might require more planning, strategizing and overall effort upfront, but it can save you an enormous amount of time and money in the long run.
Buffer is a good example of successful RAT implementation. Joel Gascoigne, the CEO and co-founder, initially set up a simple landing page with a description of his product and a call to action: provide your email to get early access to Buffer.
The product didn’t exist yet. But after 120 initial signups, Joel deemed his experiment a success, and the rest is history.
Decide who will build your app
Determining whom to hire to design and build your app will depend on many factors, such as your budget, timeline, technical requirements, and whether you want to build for Android, iOS or both.
If your app idea survived the previous step, congratulations—you might just be onto something big.
At this point, you have a validated mobile app idea that you’ve shared with plenty of other founders and app experts.
You also have an idea that’s passed a RAT with flying colours, and you’re ready to start building.
Which lead us to step 2: Who’s actually going to build it?
Should you outsource or build in-house?
That’s a question that has led to much debate in our industry. After taking clients through the MindSea Mobile App Blueprint process, we’ve advised some to build their own apps internally, and we’ve helped other clients go from idea to launch. As such, we’ve seen both sides and can say with confidence that there are pros and cons to both approaches.
Why you should build your app in-house
1. Brand & industry knowledge vs. time-consuming learning curve
An internal team will always know more about your organization than a mobile app agency will. The internal team is going to have a better understanding of organizational politics, brand voice, target audience, vision, goals, history, and competitors. These insights are ingrained in the DNA of your organization and can only be passed along to an agency through collaboration and time.
2. Faster approvals vs. process-driven approvals
It’s not always the case, but approvals usually happen faster if everyone involved is in the same physical location. The entire organization’s schedule and calendar can be synced, making it easy to lock in time for reviews without the back and forth of finding a time that works best for everyone. In addition, you have the luxury of chatting quickly about a design decision over lunch or in the break room.
3. Flexible revisions vs. scope creep
The biggest benefit of developing a mobile app in-house is having flexibility with revisions. The drawback to this situation is that you can spend countless hours tweaking, modifying and second-guessing product decisions without making meaningful progress.
When you work with an agency, there’s typically a set budget, and with this budget come constraints. You’re typically allowed a certain number of revisions and rounds of feedback at each step of the process. If you go beyond the set number of revisions, you’ll see an increase in the budget. Since the cost to build an app can vary depending on the needs of the project, this can quickly become a dealbreaker.
How much does it cost to build an in-house app development team?
Hiring great talent isn’t easy.
Finding qualified candidates to fill job vacancies is becoming increasingly tough, globally. This is even causing companies to stock-pile talent who possess certain skill sets, like software developers, regardless of whether or not a role currently exists for them.
Additionally, when it comes to new hires, the entire process takes a lot of time and money. Research from DHI Group Inc. found that U.S. companies take around 30 working days to fill open positions. As for the cost to hire an individual—making job postings, conducting interviews, training staff and running background checks—this nets out around $4,000 per hire.
Then you’ve got to pay them.
As of February 2019, the average salary for a mobile app developer in the U.S. is $107,000. And that’s just one role on the team. To get quality talent you can expect to shell out anywhere from $50,000 to $200,000 per hire, annually.
Let’s look at the type of team you should assemble and how much you can expect to pay.
Startup team (1–4 people)
You already have a team that consists of developers and designers (maybe you’re one of them), and now you’re ready to build your mobile product. It’s likely you’re either getting investor funding or your team has agreed to invest their time and energy as sweat equity into the product. Since your team is small, your developers will need to learn on the job and designers will sketch, mock up and design every element of the product.
Small and agile app team (3–5 people)
You’re a venture-backed startup or mid-size company that needs a dedicated team to build an app. Unlike the startup approach, you will need to pay people with real cash. You may want to include a mix of both independent contractors and full-time staff in your HR mix. Here’s a sample slate of the roles you need and their salaries (salaries reflect full-time averages for named roles held in New York City, as per Glassdoor):
- Mobile app developer: $81,000
- Mobile app designer: $81,000
- Product manager: $119,000
- Senior iOS developer: $148,000
Total: $429,000
Ideal app team (5–8 people)
You expect thousands of people to be using your app at launch, so you can’t afford to build a product with glitches or bugs—you’re striving for perfection. Therefore you need to build a team of heavy hitters to bring your vision to life. Here’s what your ideal team might look like (salaries reflect full-time averages for named roles held in New York City, as per Glassdoor):
- Mobile app developer: $81,000
- Backend developer: $133,000
- Lead UX designer: $124,000
- Mobile app designer: $81,000
- Product manager: $119,000
- Senior iOS developer: $148,000
- Senior Android developer: $132,000
- Quality assurance engineer: $77,000
Total: $895,000
Payroll & taxes
In addition to the salaries of these team members, you’re going to be on the hook for other costs such as taxes, unemployment and health care. Every country, state and province has different laws about these items, so check with your local government to get a clearer picture of your expected costs.
Overhead costs for an in-house team
The cost of hiring and building an in-house team doesn’t end with their contracts. You need to offer your employees a work environment that is both well-equipped and rewarding. Every hire is going to incur additional costs, such as:
- Hardware requirements (laptop, test phones and tablets, etc.)
- Software requirements (Photoshop, Illustrator, InvisionApp, etc.)
- Office space (and supplies) or tools for remote communication
Why you should outsource to a mobile app agency
1. Established team chemistry vs. new team dynamics
Most iOS app development and Android development agencies have teams of designers, developers, quality assurance engineers, and product managers who have worked together on multiple projects. Even if you already have one or two people on your team who have mobile experience, the people you bring in to fill the gaps have probably never worked with your team before. As such, you’ll go through the growing pains of getting a new team on the same page. The team will need to learn each other’s strengths and weaknesses—things an agency team will already be familiar with.
2. Extensive app experience vs. a mix of backgrounds
An agency that specializes in mobile will have a greater understanding of the space than a generalist app developer. This agency will also have a streamlined process that’s been tried and tested on hundreds of app builds before.
The best app agencies use a variety of strategies to gain a better understanding of the app requirements, primary goals and priority features. From there, more experienced teams can leverage existing industry experience and the latest trends to offer a perspective that only comes from focus.
How much does it cost to hire a mobile app development agency?
Ballparking the cost of developing an app is not so straight-forward; there are so many factors that affect the end price that to say anything other than “somewhere between $1 and $1 million” would be misleading.
That said, you can safely assume that your app will run you six figures.
A combination of factors contribute to the wide price discrepancy for app development. (Some of these factors apply when budgeting to hire an internal team, too.)
- Agency team experience: If an agency is still relatively new in the industry and has yet to build a quality portfolio, it’s likely that they will take projects with smaller budgets. Agencies with extensive experience are likely to charge more because of their past results and the need to cover higher wages.
- Agency team size: Some projects don’t require large teams for app development, and those come with a smaller budget.
- App complexity: An application that connects with multiple APIs, requires user login, or uses online payment, GPS and other bells and whistles is going to cost much more than a simple photo filter app.
- Backend scalability: When building an app, it’s not easy to predict the architecture that may be required to support an unknown number of users. You could take the single-server architecture approach, but this can cause issues if you have 400 or 500 users at the same time. Therefore, you need to consider a multi-server cloud architecture, which is easier to scale when an influx of users or data comes in; however this approach could increase your budget.
- Agency location: A 20-person app agency located in India is likely to cost much less than a 20-person app agency in the heart of New York City.
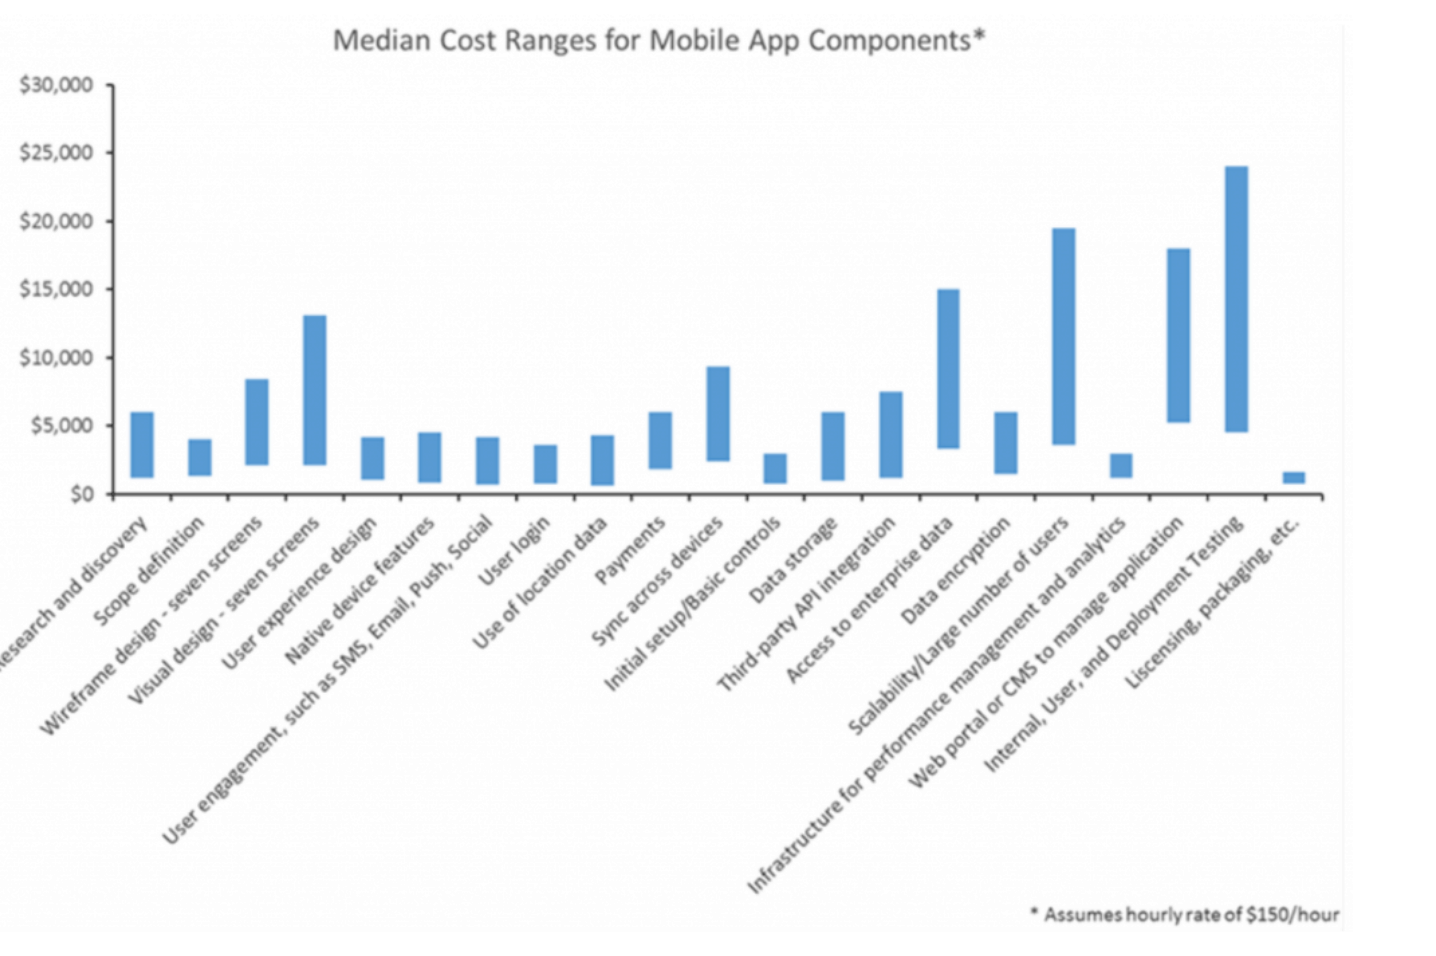
According to a survey conducted by Clutch a few years back, five line items in the app development process had a wide range (50+ hours) between the median high and median low values:
- Visual design
- Access to enterprise data
- Backend built for scalability of users
- Web portal or CMS to manage application
- Internal, user and deployment testing
These numbers illustrate the significant differences in the app-building process from agency to agency. Some app agencies spend 60 hours on visual design, and others are more likely to spend 10. Some agencies spend 20 hours on testing while others spend 70.
So know that your expected costs to build an app all depend on the agency, their expertise and of course, the project.
Who do you need on your mobile app team?
When you compare hiring an app agency to develop a mobile app vs. building a team in-house, it’s easy to see that what might be good for one company might not be good for the next. Outsourcing could be a more cost-effective and risk-free approach for a one-time build, while an internal team might make more sense long-term if you’re developing a scalable product that will be frequently updated.
At the end of the day, the most important factor is this:
Talent.
If you’re a larger company with thousands of employees, it might make sense to hire a mobile app agency to execute the entire project. If you’re a small startup that has yet to get funding or launch a product, you might want to bring in a few new founders to build the app with you.
It truly depends on your situation.
For example, according to 500 Startups founder Dave McClure, the ideal startup team should have three types of people: hackers who can code, hustlers who can manage and understand the business, and designers who can lead and implement design.
If you’re a larger company needing to build a scalable app, your team might consist of a larger group of talent that knows how to build an app. Some of the key roles you might want to look for include a product manager, app designer, iOS developer, quality assurance manager, user experience designer, user interface designer, API developer, Android developer and backend engineer.
Talent is the most important (and most expensive) part of the app development process—whether an agency is paying the wages or you are. The success of your app may hinge on finding the right talent for your team.
Should you hire a mobile app designer or outsource?
We’ve seen both strategies work. So let’s talk about the scenarios in which it makes sense to outsource your mobile app design and when you might be better off hiring a design team.
Why do I need an app designer?
The biggest mistake that first-time app builders make is not understanding the role that an app designer plays in their team. As a result, we see plenty of companies and startup founders hiring people with expertise that doesn’t match their needs. A graphic designer and a UX (user experience) designer are not the same thing. A designer with 10 years of experience in print may not be the best fit for your mobile app.
READ MORE: Everything You Need To Know About User Experience Design
Before you decide whether to outsource design, you need to identify exactly what type of designer you need.
If you’re not sure what you should be looking for, don’t be afraid to reach out to peers or ask questions in forums like Hacker News or /r/Startups on Reddit. Another great place to gain insight is the Job Search on AngelList—just sign up and type “Designer” in the search bar:

You’ll get a list of design roles at startups. Look at the skills they’re hiring for, and use this information to get a better sense of the skills you need right now vs. the skills you might need down the road.
As you consider whether to outsource design or bring a designer in house, there are three major factors that will influence your choice: cost, time and industry. Let’s talk about each and the impact they have on your decision.
1. Budget considerations
Whether you’re working in a startup or building an app within an established company, keeping your costs low is often one of the most important factors.
For startups:
If you’ve already raised a seed round of capital or have an angel investor, you might be able to hire a designer to be part of your founding team. Plenty of startups—including Airbnb and Twitter—have taken this approach, but not every startup can afford to.
Startups often consider outsourcing design because they see it as a more cost-efficient approach and that doesn’t carry long-term expenses like salaries or equity. If capital is tight, it might be better to bring in a hired gun or an agency with startup expertise to help you bring your ideas to life.
For established companies:
You may already have designers in other departments. If that’s the case, you could look to adjust their priorities to help during the app-building process. If not, bringing in outside talent could help budget-wise and save you the hassle of recruiting and onboarding an internal hire.
Remember: If your budget is forcing you to hire inexperienced talent, you’re putting your company at risk. This is a reality whether you decide to outsource or hire a designer to join your team. You’re risking the possibility of receiving designs that don’t do the job or wasting time with talent that gives you headaches instead of quality work. Which takes us to our next point…
2. Time considerations
Hiring a new designer to bring your app to life can be a huge time commitment. If the designer doesn’t have experience in app design or doesn’t meet your expectations, things can quickly turn ugly—and the project will likely be delayed due to the designer’s inability to execute your idea.
This scenario could also happen if you outsource design to someone who isn’t an expert. You wouldn’t believe how many times we’ve had to help startups fix a mess that was created because they hired their best friend’s cousin to design their app instead of hiring an expert.
You’ve heard this saying:
“If you think it’s expensive to hire a professional to do the job, wait until you hire an amateur.”
If you want to reduce your risk of hiring someone without experience, read this article about questions that you should ask a potential partner before hiring them.
If you’re able to hire a company or designer who has deep experience working on projects like yours, this relationship can be gold. Besides bringing great experience to the table, an outside agency or designer can move from the initial meeting to actual designs and prototypes within weeks. Our blueprint process takes an accelerated approach, and as a result we’ve helped plenty of clients go from scribbles to a prototype in a matter of days.
3. Industry considerations
As you make this decision the final element worth considering is the competitive landscape. An industry like advertising is going to place more value on design than an industry like
As you make this decision, a third key element is the competitive landscape. An industry like advertising is going to place more value on design than an industry like academia. If you’re entering an industry where design doesn’t matter that much, it’s possible that your technical team will be able to put together a successful interface. If you’re going into an industry where quality design is standard, you’ll have to bring in design talent to have successful launch.
The key is not finding someone who can make your product pretty; the key is finding a designer or design team who can take a problem and find a solution. The biggest differentiator between a good designer and a great one is their ability to add value beyond what you’re asking them to do. The best design teams will spot issues with your onboarding process before you do and show you a better approach that can set you apart from the competition.
The consensus
Some companies, like Medium, have hired agencies and found great success, while others, like Facebook, have kept the work in-house. It all depends on your situation, but the conclusion to the debate is simple:
Yes—companies can and should outsource design when it makes sense.
You might not even need the app agency to take you the entire way. For example, we worked closely with the Proposify design team on their mobile app, but after we helped them create high-fidelity prototypes, it was on their team to bring the final product to life.
If you want to see the results that are possible when an app agency helps you go from idea to launch—or simply lays the foundation you need to build in-house—schedule a free consultation with one of our senior app strategists today.
Create a mobile app strategy
Formulating a strategy for any new project ensures that you start off on the right foot and don’t miss critical steps along the way. For an app build, this means understanding 1) the questions you need to answer before you proceed, and 2) the results you’re looking for at the end of the day.
The most important questions to ask when building your strategy
When you start building a mobile app strategy, there are a few key questions you need to ask yourself. These won’t be the only questions you ask, but they’ll get the hamster wheel spinning and guide you toward the right places to research:
Who is the competition?
Keep in mind that the competition is not always an app—it could just be a spreadsheet.
How much will I need to spend?
This is a loaded question. We talked about the costs to build an app in the previous chapter, so jump back there for a minute to get your baseline cost projections. On top of the build cost, identify what your tech spend will be, then compare it to the market size and the hypothesized amount you can earn through subscriptions, IAP, registration fees, etc.
What are my goals for the app?
In other words, what are you actually trying to accomplish? Let’s dive in a bit deeper on this one, because articulating your goals is critical for a successful strategy.
Identifying your goals & objectives
If you don’t set goals and objectives, you’re just building for the sake of building. You need to have a clear understanding of what you’re trying to accomplish so that every move you make will get you one step closer to achieving your vision.
But how do you set goals for a mobile app if you’ve never built one before?
“Start small. Don’t get carried away thinking about what the app will be with 1,000,000 users. Start with how the app should work with 10 users.” —Reuben Hall, CEO at MindSea
Your initial objective doesn’t need to be building an app that rivals Instagram or Spotify or Dropbox. You’re building an app for a purpose—to solve a specific problem for your users. Your goals and objectives should be rooted in what you’re planning to do for those users.
Identify key metrics & set KPIs
There are hundreds (probably thousands) of metrics you could decide to measure. Good news: You don’t have to look at every single one.
If you’re keeping tabs on the most important metrics, you’ll have a big-picture understanding of how your app is doing. When you’re building your app strategy, restrict your focus to these key metrics.
So what are the most important metrics to measure?
- Downloads – The total number of times your app has been downloaded. Are people interested enough to actually download your app?
- Monthly active users – The number of users that log in and take action inside your app at least once per month.
- Daily active users – The number of users that use your app daily. This will be your most engaged group of users.
- Churn rate – The percentage of users that are cancelling or deleting your app each month.
- Number of sessions – How many times your app is used daily or monthly.
- Session time – How much time users are spending in your app. Along with the number of sessions, this will tell you whether your app is successfully attracting and hooking your users.
If you’re not sure what you should be measuring, the folks at AppBoy have created a great guide to app metrics. These metrics will help you better understand how users are responding to your app. Mixpanel and Google Mobile Analytics are two great analytics providers that offer insight into which features are being used most frequently and which ones are resulting in frustration.
Understand what will activate your users (and track it)
One of the most important things to figure out before you start building is how you’re actually going to get users activated after they download.
If someone downloads your app, congratulations—that’s step one complete.
But what happens next?
You have to get them to actually use it.
Smartphone users spend 50% of their time in their most-used app and 97% in their top 10 apps. Does that mean they only keep 10 apps on their phone? Of course not. They download new apps, open them once (maybe), then hide them in a folder never to be seen again.
It’s your job to convince them to stick around.
That’s why you need to find the one thing that activates them the most.
“Twitter realized that once you followed 30 people you were more likely to come back so they suggest popular accounts when you sign up. Dropbox saw that users who uploaded at least one file were much more likely to use Dropbox again and so, you guessed it, they encourage you to upload a file during signup.” —Melanie Balke
If you know what’s most likely to activate your new users, you can focus your onboarding and initial signup experience on getting that one thing to happen.
What you need to do during the strategy phase is come up with a few hypotheses about what will activate users. Then you can ensure you’re collecting the proper data to measure those hypotheses from the beginning.

Navigate this section
Plan your mobile app UX & user journey
User experience is key to the success of your app. How your app functions needs to align with the desires and expectations of your end user. How easy is onboarding? How intuitive is the navigation? You’ll want to spend some considerable time on this, collecting all the insights you need to build the app of your audience’s dreams.
Why planning your UX in advance is so important
Until you plan your user experience (UX), you have no idea how complex your app is going to be and how much time you’ll need to invest. You’ll also have nothing tangible to show people during your user testing sessions.
Your UX should follow the path of least resistance for the user. The goal is to carry them from point A to their solution as efficiently and intuitively as possible.
If you don’t plan out this journey before building, you’ll likely end up plotting a complicated path for your users—and then spending time and resources to fix it.
“The later you find issues, the more expensive they’ll be to fix.” —Tomas Hofmann, Software Developer at MindSea
How to plan the UX & user journey
Mapping out the user journey begins on the whiteboard. (If you’re a remote team, use Miro.)
At the stage, you’re defining the entire user journey, screen by screen. This doesn’t mean crafting beautiful app screens—you’re only mapping out the wireframes to understand how the app will function.
Start with your overall goals for the user. What are you trying to help them do?
Then map out how they can get from point A to point B as efficiently as possible.
Once you have the overall journey mapped out, you can refine your wireframes using Sketch. But always make sure you’re mapping before investing extra resources into design.
A seamless UX is often what separates the successful apps from the not-so-successful apps. Here are a few big mistakes you need to avoid when planning your app’s UX:
Mistake #1: Not understanding your users’ needs
Understanding your users is the foundation for building any great product, mobile apps included.
Before you rush into designing your app, you need to understand your audience and be able to answer these questions—which you might already have some answers to if you did your homework in the previous section:
- What features and benefits would provide the most value to our user base?
- What pain points or problems does our product solve?
- What makes our solution better than the competition?
- What sort of interface is critical for providing a great mobile user experience?
Designing your mobile app UX is an iterative process that may change over time as you conduct research and receive customer feedback.
A common framework is the user-centered design (UCD) approach, which focuses on the users and their needs during, rather than after, the design process.
Here’s a flowchart of the UCD approach:
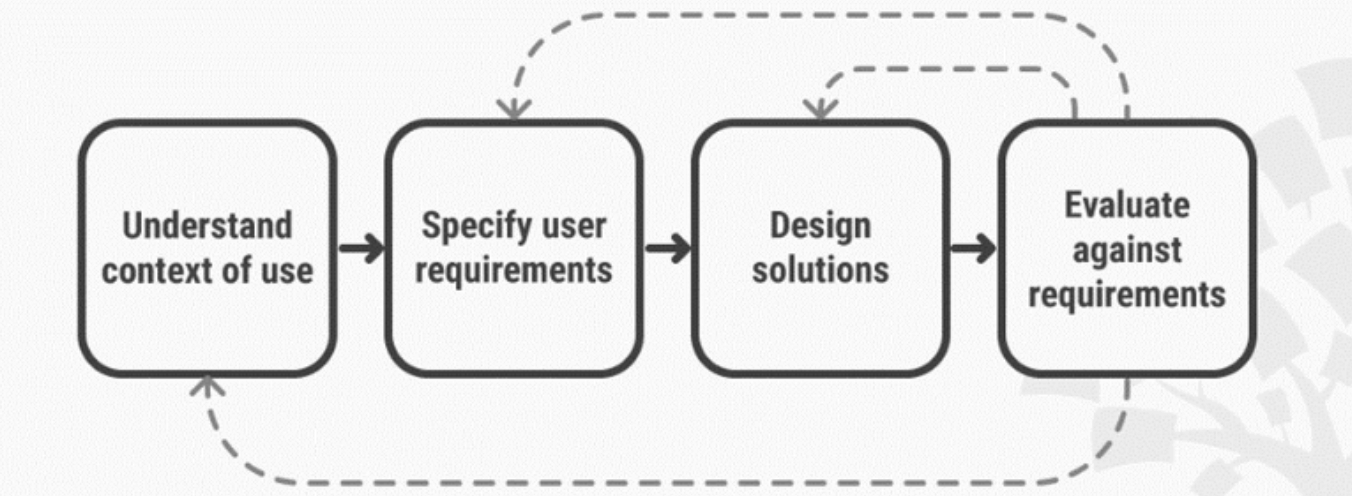
Simply put, proper customer research and an iterative approach will help you understand who your users are and what they need, and then adapt your design accordingly. The goal is to create an experience that truly resonates with your audience.
Mistake #2: Trying to incorporate too many features
When people develop a mobile app for the first time, they’re tempted to throw in every cool feature they can think of.
Unfortunately, this rarely translates into a good user experience.
First off, having too many features will overwhelm your users and make them ditch your app. Second, when you’re first launching, you want to focus on refining your core user experience instead of rolling out a bunch of poorly developed features.
What core features do you need in order to launch? A shopping cart? Photo editing filters? Prioritize those.
Then, analyze which features of your app are used the most and focus your efforts on making those experiences even more engaging and intuitive. Additional features can always be added in future releases.
To illustrate, let’s take a look at Lyft.
Lyft’s mobile UX designers have mastered the art of prioritizing features and continually refining the user experience around the app’s core functionality: getting a ride. In 2017, the company rolled out a different user experience that enabled users to see nearby drivers, wait times and costs, making it easier for users to order a ride.
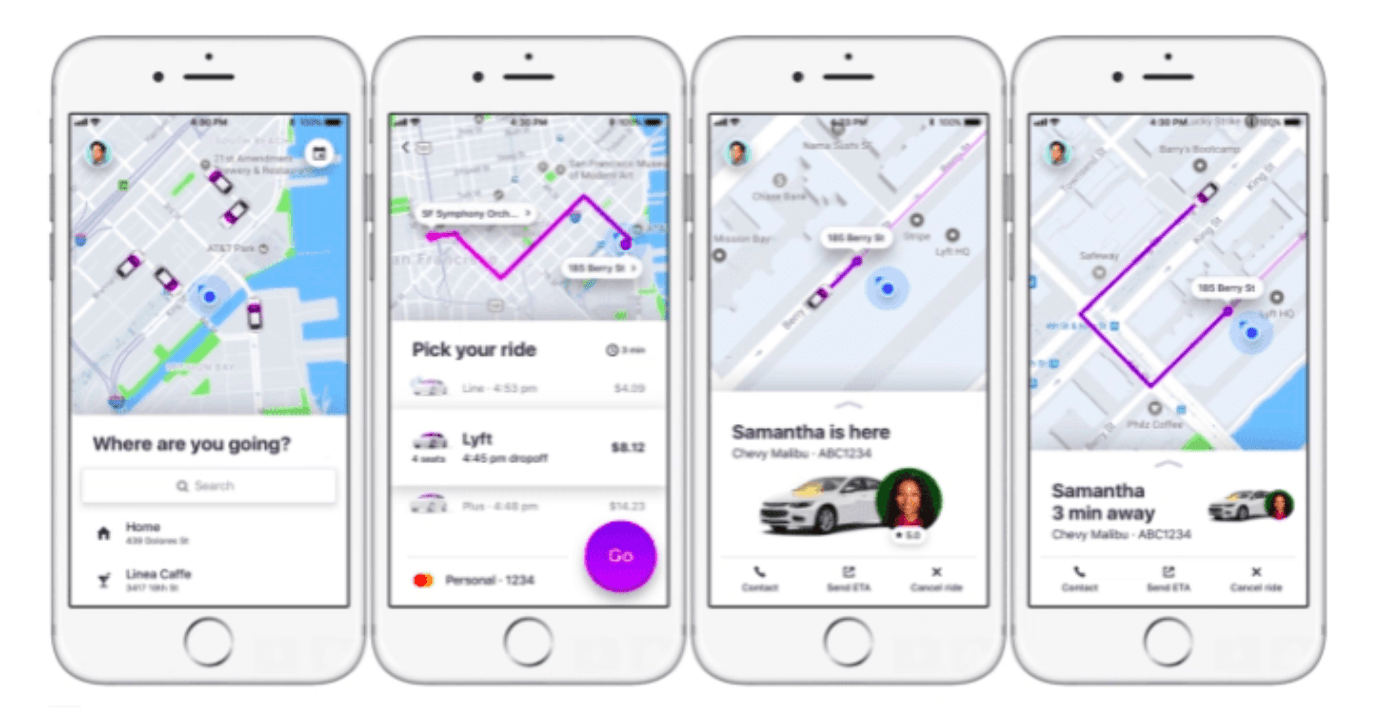
To sum up: When designing your app, keep it simple. Prioritize the features that are critical to a good user experience, and continually refine them.
Mistake #3: Using jargon that your customers don’t understand
You want to speak the same language as your users. Esoteric terms and phrases lead to a poor user experience. Calls to action that use brand-specific jargon won’t inspire anyone to action—they’ll just create confusion.
Simple, direct communication is best. Make the interaction comfortable by using accessible words and phrases; avoid acronyms, brand-specific terms, cultural axioms and technical terminology that people might not understand.
Here’s an example from Think With Google:
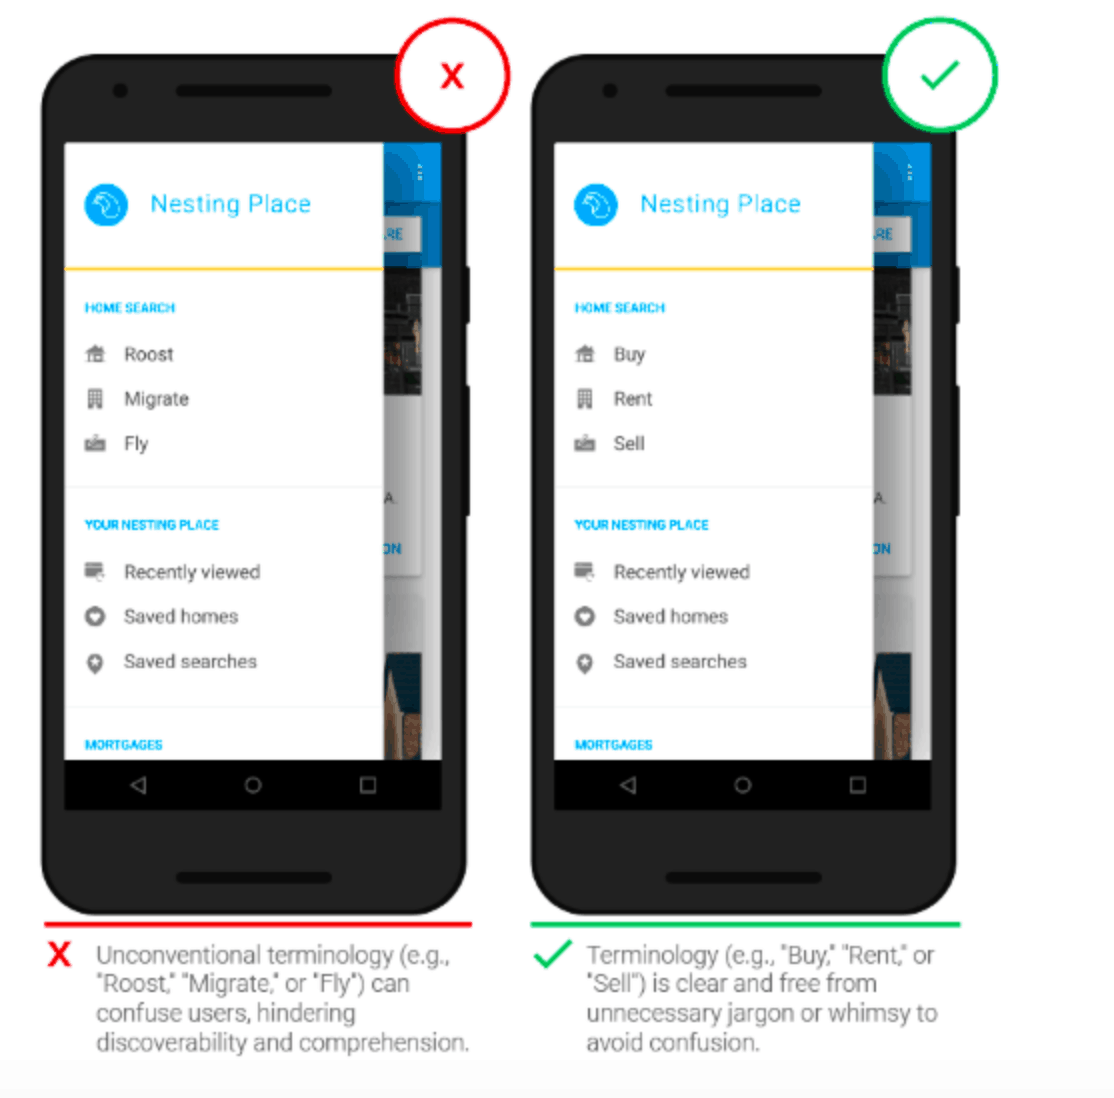
As you can see, the design on the left uses the terms “Roost,” “Migrate” and “Fly,” which are brand-specific and unclear. A user’s not likely to go further. On the other hand, “Buy,” “Rent” and “Sell” are familiar words that a user will immediately understand.
Mistake #4: Cluttering up the user interface
Another big mistake app creators make is cluttering up the design with buttons, images, videos, text, etc. Such visual overload can make the app feel too complicated, again resulting in a poor user experience.
When you’re planning the user journey screen by screen, whether you’re using a physical whiteboard or a tool like Mira, resist the urge to include all the things on every screen.
Removing visual clutter and striving for minimalism is a better approach. Just as you prioritize your core app features, you need to focus on the visual content that’s valuable for your user and remove elements that don’t help your user get to their goal.
Try to design each screen with one primary call to action. As a general rule, remove irrelevant information and develop a clear visual language.
Mistake #5: Neglecting the first-time experience
The first-time experience is one of the most important components of the mobile UX. Without a pleasant onboarding experience, users are likely to never come back. In fact, research by Localytics shows that 21% of users (a little less than 1 in 4) never return to an app after the first use.
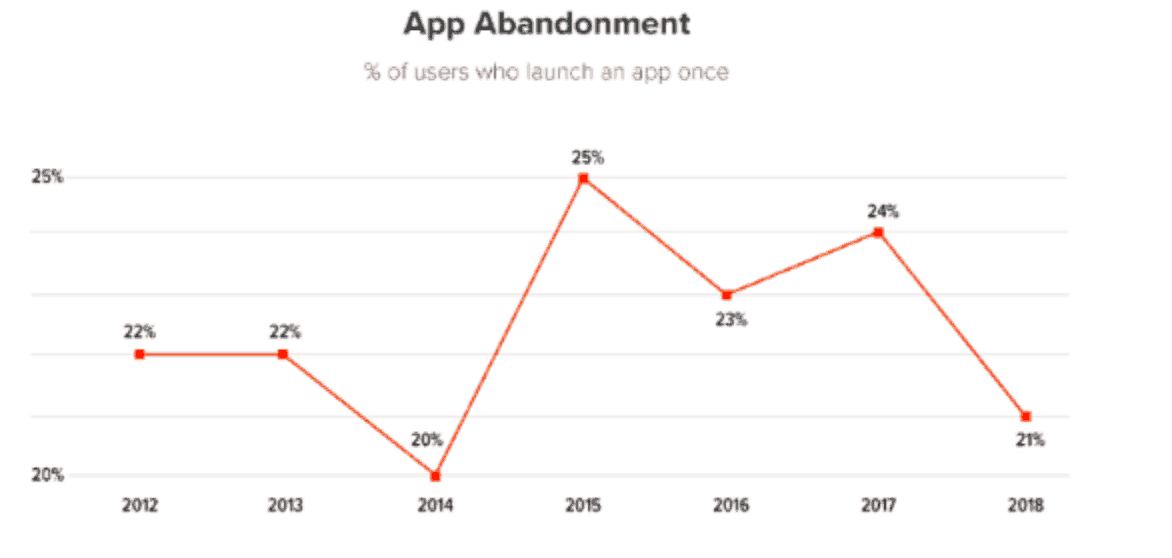
This means it’s critical to make a good first impression.
According to UX Planet, one of the most effective onboarding strategies is contextual onboarding. Unlike up-front tutorials that deluge new users with information all at once, contextual onboarding offers instructions only when a user needs them.
Duolingo, a language learning app with millions of users, is a great example of contextual onboarding:
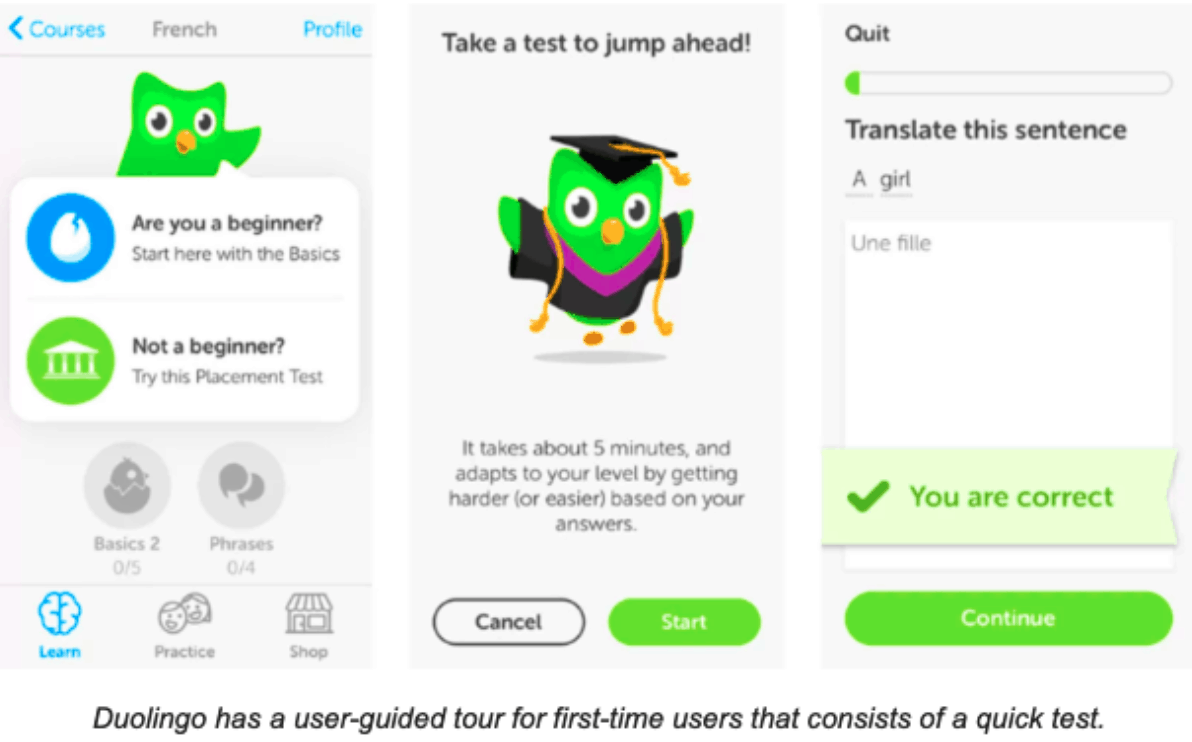
After signing up, users are guided to choose between “beginner” and “not a beginner.” Then the app takes users to its core product almost immediately, progressively revealing how the app works. Users who are not beginners can take a quick test in order to get an experience that’s tailored to their skill level.
Duolingo’s onboarding journey allows the customer to get a true sense of the app’s value; for that reason, they are much more likely to come back.
There are many other strategies that you can use to design a great first-time experience, but the important thing to remember is that you need to guide users (without overwhelming them) and help them achieve their goal. After all, that’s why they downloaded your app!
Mistake #6: Creating confusing & ugly navigation
Even the best onboarding experience is useless if your customers have a hard time finding what they’re looking for. When someone starts using your app, they should easily be able to figure out where to go and how to get there.
There are two key questions to consider here:
- What do I need to include in the navigation?
If your app has 10 places a user could go, that absolutely does not mean you should include all 10 places in your primary navigation section.
Only include the essentials, and ensure that the UX can take users even deeper as they navigate your app.
- What type of navigation should I use?
Part of designing intuitive navigation is determining which type of navigation to use. Hamburger menu? Tab bar? Responsive multi-level navigation?
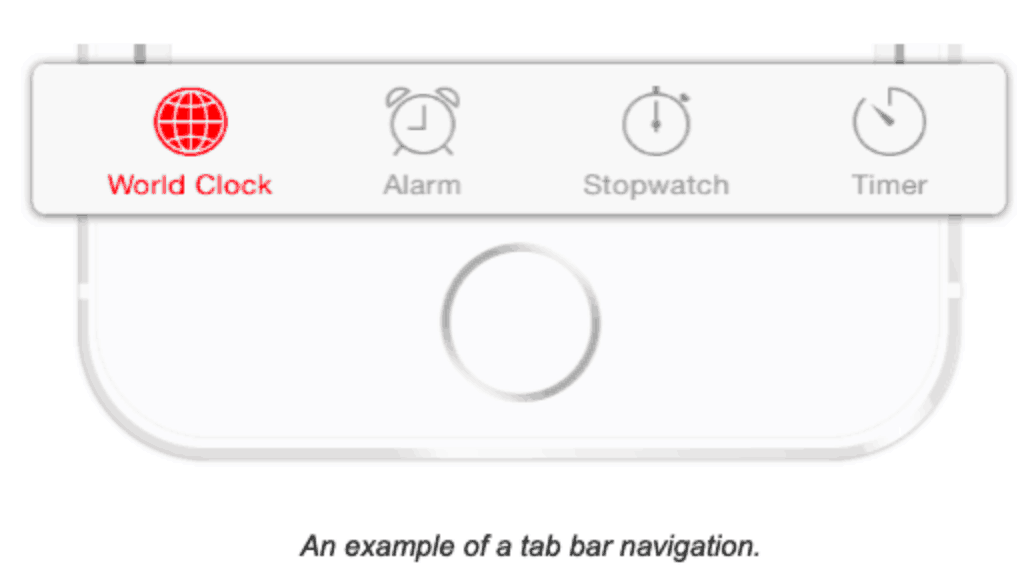
Ask yourself: Which type of navigation is most intuitive and familiar to my users?
The navigation should be smoothly integrated into the structure of the app, rather than drawing focus away from the content. The user should also be able to tell where they are in their user journey so that they can easily navigate to where they want to go. Lastly, always strive for consistency. Don’t put navigation controls in a different spot from one screen to the next! This will only confuse and disorient your users.
Helping users navigate should be top priority for every mobile app. After all, even well-crafted features or the most compelling content is useless if people can’t find it.
Build your product roadmap
A product roadmap arms you with everything you need to build your app, including budget and timelines for each step of the process. This document, which should include your UX plan, will become your go-to resource for keeping the entire project on track.
Once you know how your app needs to function, the next step in the process is planning out how it will come to life. This will be what’s called your product roadmap.
“Why am I creating the roadmap after planning the UX?” you ask.
If you try to draw a roadmap before you know how the app needs to function to accomplish its overall goals, you’re destined to spend more time tweaking your roadmap than actually doing the work required.
At this point, you know why you’re building the app, what it’s going to accomplish for your users, and how it will get them there. So now is the perfect time to figure out how long it’s going to take you and your team to do it all.
How long does it take to build a mobile app?
That’s one of the most common themes in our inbox.
- How long does it take to go from an idea to a fully functioning app?
- How long does it take to design the interface?
- How long does it take to write the code?
The only question we get more frequently is How much will it cost to build an app?
Turns out those two questions are related.
When it comes to building a mobile app, the amount of time it takes will depend on your budget, the functionality you’re looking for, the expertise of the design and development team, and their process.
But to help you get an idea of the timing, the best approach we can take is to draw from our own experience. So we’re going to break down our process and our typical timeline for helping organizations bring apps to life.
What key factors influence the timeline?
While the timing and the cost of building an app are often directly related, there are a number of other factors that impact the time between initial contact and app launch: your organization’s design needs, the app’s defined functionality, the intricacy of the user experience, feedback from users during the testing process and more.
Of all the things that go into a mobile app, these two factors influence the timeline the most:
- Information gathered before the development stage
This is everything you’ve collected to this point, from your competitor research to your customer research, the user journey you’ve planned and the features you’ll include—it all affects the timeline and budget.
Let’s take features for example. Will you require in-app payments? Will you need to integrate with any third-party tools?
The answers to these questions will influence your timeline (and therefore your budget).
- Collaboration & communication
When it comes to communicating with your app agency or internal development team, how many people need to be involved in the decision-making? Should multiple departments have a say? How many levels of approvals are necessary? Are you willing to invest the time to give your development team quick approvals?
Again—the answers to these questions will have an impact on the timeline.
For many companies, the creation of a mobile app is a pivotal business decision; as a result, the app is a top priority (good) but lots of people may want to be involved—meaning approvals can take time (bad).
Other companies don’t give their app development projects that kind of internal attention. When your app is low on the priority list, communication and approvals are a slow go, and a process that could have taken eight weeks takes eight months.
What’s the average timeline?
Now you can see why the timeline can vary greatly from project to project, company to company. If you scroll back to Section 1, you’ll find our general timeline: four weeks to research and plan then at least two months to build and launch.
That’s a good starting point for your product roadmap; tailor your timelines based on the two key factors above. Then once you’ve mapped out the road ahead, it’s time to start building.

Navigate this section
Start pitching investors or internal executives
Once you’ve got the key strategy, design and resourcing elements of your app figured out, you are in a good position to approach investors or key decision-makers. These folks can provide additional support as you see your product through to the final stages before launch.
Whether you’re trying to raise capital for a brand-new startup or sell an executive team on the value of a mobile app, you’ve probably heard enough about the value of storytelling for a lifetime.
Instead, we’re going to give you some practical strategies that you can use when crafting your pitch.
We’ll give you a rundown of the factors that matter most to investors and decision-makers, along with a simple checklist that will help ensure that your pitch is a memorable one. We’ve pulled this collection of thoughts from some of the best founders and investors in the industry, so you can rest assured that these insights will help you stand out.
1. Start by getting access to the right people
Some investors receive hundreds of pitches each week. Most executives are also getting hundreds (if not thousands) of emails per day.
This means it’s on you to make your pitch stand out.
If you’re a startup founder, you can take a step in the right direction by getting an introduction to the investor from someone they know or trust.
Across the tech industry, there’s a very firm belief that an introduction is the best way to make a connection. If you’re still building a professional network, don’t worry—you can still wrangle an introduction with a bit of legwork if you know who to call.
Mark Suster, founder of VC firm Upfront Ventures, points to a list of people who can give you access to investors:
- Startup-oriented corporate lawyers: VCs work with corporate lawyers all the time, so establishing a relationship with them can pay dividends. According to Suster, the best early-stage corporate lawyers run in the same circles as the best VCs. It’s a great fit because in many cases, the first investment a startup makes is with the lawyers incorporating their company and divvying up stock.
- Startup-focused recruiters: Recruiters are social by nature, and they also have great networks, from members of the startup community to the VCs and angels that back them.
- Portfolio companies: If you have a CEO using your product, and their company is funded by a VC who aligns with your interests, reach out to that CEO and build a relationship. Most VCs list their portfolio companies directly on their websites, so it’s not that challenging to figure out who’s connected to whom. At the same time, don’t reach out to Mark Zuckerberg to make your intro to the folks who helped his seed round—reach out to an early-stage founder or someone who is already in your network.
- Entrepreneurs in general: You might know someone who’s successfully raised capital for a project in the past. Use LinkedIn or AngelList to see who your connections in the entrepreneurship world are connected to, and don’t be afraid to ask for an introduction.
- Former colleagues and peers: If you have a connection—be it a former co-worker or the friend of a friend—who worked with a VC in a past career, ask for an introduction.
- Other investors in the industry: While investors are competitive people, they are also very collaborative. Many startups have multiple investors and as a result, those investors have established relationships through board meetings, networking events and more. If you’re already in good standing with one or two investors, don’t be afraid to ask them if they know anyone else who might be interested in learning more about your app.
The same strategy works if you’re trying to pitch decision-makers at your own company. Ask a colleague who’s better connected to the executive team to set up a meeting.
2. Get investors & decision-makers excited about your app idea
In an essay about convincing investors that your startup is worth their time and money, Paul Graham writes:
“Most investors decide in the first few minutes whether you seem like a winner or a loser, and once their opinion is set it’s hard to change. Every startup has reasons both to invest and not to invest. If investors think you’re a winner they focus on the former, and if not they focus on the latter.”
That’s why it’s so important to get those first few minutes right.
The exact same principles apply to decision-makers and executives at established companies: The first few minutes are crucial.
Shake hands. Make eye contact. Come prepared. Be enthusiastic. And recognize that the person on the other end of the table is just that: another person.
Once you’ve tackled those basics of making a good first impression, deliver a presentation that transmits your excitement about the app to your audience.
Over the years, we’ve seen pitch decks with many variations in terms of flow, and we’ll be the first to tell you that there’s no concrete formula that will guarantee success.
That said, here’s a formula recommended by the folks at Sequoia Capital that can easily be repurposed for an internal, executive-focused presentation.
Checklist for startups pitching investors:
- Company purpose: Define your company in a single declarative sentence. This is harder than it looks. It’s easy to get caught up listing features instead of communicating your mission.
- Problem: Describe the pain of your customer. How is this addressed today and what are the shortcomings to current solutions?
- Solution: Explain your eureka moment. Why is your value proposition unique and compelling? Why will it endure? And where does it go from here?
- Why now? The best companies almost always have a clear why now? Nature hates a vacuum—so why hasn’t your solution been built before now?
- Market potential: Identify your customer and your market. Some of the best companies invent their own markets.
- Competition: Who are your direct and indirect competitors? Show that you have a plan to win.
- Business model: How do you intend to thrive? (Side note: Keep in mind this tip from Reid Hoffman, founder of LinkedIn and partner with Greylock: “The general rule is one business model drives the business. It’s tempting to list multiple revenue streams because you’re trying to prove that you will be big.”)
- Team: Tell the story of your founders and key team members.
- Financials: If you have any, please include.
- Vision: If all goes well, what will you have built in five years?
Checklist for internal teams pitching decision-makers:
- Problem: Describe the pain of your customer. How is this addressed today and what are the shortcomings to current solutions?
- Solution: Explain your eureka moment. Why is your value proposition unique and compelling? Why will it endure? And where does it go from here?
- Why now? The best companies almost always have a clear why now? Nature hates a vacuum—so why hasn’t your solution been built before now? Why is now the right time for the company to roll out an app?
- Market potential: Identify how a mobile app can help the company reach even more members of your current market, or how it will capture a new market.
- Competition: Who are your direct and indirect competitors? This could be existing or new competition. Show that you have a plan to win.
- Team: Tell the story of your key team members that will be building the app.
- Financials: Include projected costs and budget needs
- Vision: If all goes well, what will you have built in five years?
We recommend using some variation of these 8–10 elements in your pitch deck, but it doesn’t have to follow this exact sequence.
In fact, the order in which these slides go is one of the most commonly debated elements of a pitch deck. Some decision-makers like to see the team slide up front and center, while others prefer it at the end of the deck.
Whatever your deck looks like, we believe there’s one other key element your pitch should include:
A functional prototype.
3. Build a quality prototype & bring it to the meeting
This pitch deck from the folks at Buffer has been widely circulated over the last few years:
The slide deck we used to raise half a million dollars from Buffer
Take a minute to click through. You’ll see that all the pitch deck elements listed above appear in this deck in some variation, but Buffer also included a prototype. The pitch shows screenshots of the app, and Buffer already had an online presence that could easily be accessed and tested.
A tangible prototype that paints a clear picture for everyone in the room is 10x better than describing an abstract idea. In order to sell investors and executives on your app, make sure your pitch includes a prototype.
If you’re looking for an easy-to-use checklist for crafting your pitch, check out these these tips in a simple format.
Build your mobile app
You’ve brainstormed, you’ve planned, you’ve researched and tested. You’ve designed, you’ve pitched, you’re excited for launch—just one step left…
How to bring your app to life
So you’re ready to bring your app to life…
How do you do it?
First thing’s first, let’s understand the approach you should be taking. As is the case with the development phase of almost all software products, agile sprints are the most common approach.
The team at Trello explains the idea of “agile development” well:
Agile refers to a set of “methods and practices based on the values and principles expressed in the Agile Manifesto,” which includes things like collaboration, self-organization, and cross functionality of teams.
And the most common way to implement Agile development is through Scrum.
“At the beginning of each sprint the team commits to the amount of work they are going to try to complete and work towards that goal. Once features are developed they go through internal review cycles like code review, design review and QA. Beta builds are used to demo and test completed work.” —Graham Burgsma, Software Developer at MindSea
What is Scrum & why should you use it?
At its core, Scrum is a framework for helping teams work together efficiently and effectively.
It’s not a product.
It’s not a tool or piece of software.
It’s a process built around frequent sprints where lots of work is done over a period of time, then work and progress are reviewed at the end.
Tomas Hoffman, software developer at MindSea, sums up why our own development team uses Scrum:
- You can constantly verify that you’re going in the right direction
- At the end of each Scrum, you have a workable, testable and demo-able product to show your stakeholders
- It helps to uncover problems as you go that were missed in UX planning
- There’s room for ongoing feedback and re-evaluating before you go too deep into something wrong
- As a development team, you get to evaluate what’s working, what isn’t and what can be improved
Here’s the thing:
Your development team could be running 100 mph working on building the app. They’ll feel productive, work will be happening, and all will seem great…
…until you realize at the end of the build that they were going 100 mph in the wrong direction. And you’re now spending 2x the amount of time backtracking just to rebuild it all again.
“There are so many unknowns in app development. A flexible process that embraces that is essential to moving forward without spending months planning a plan that will never end up being the plan.” —Graham Burgsma, Software Developer at MindSea
What does the Scrum process look like?
Since Scrum is a general system, it can be modified based on how your team works best.
The standard Scrum process will look something like this:
- A senior developer starts building the core architectural design of the app—the goal is to have something testable as soon as possible
- The team starts iterating every week to add features and expand the app
- Check-ins happen biweekly to assess progress and direction
“Make things work, test it, repeat.” —Tomas Hoffman, Software Developer at MindSea
What about the quality assurance process?
Generally speaking, the QA team is separate from the development team. That way, the people building the app aren’t the ones reviewing it for bugs and flaws.
Why bring in more people for QA?
If you’re spending hours upon hours creating the functionality of the app, two things are going to be true: (1) You’re going to be blind to small mistakes or bugs (it happens—don’t worry), and (2) you’re going to understand the nuance and ideal functionality of the app.
That second one sounds like a good thing—shouldn’t that make QA testing easier? Not quite. Here’s why:
The QA team has one goal: Break the app.
They’re trying to do whatever they can to find technical bugs, UX flaws, and pretty much every other possible roadblock your end users could encounter. Here’s what the division of labor looks like:
- The QA team leads the testing
- They share what they found (and broke) with the development team
- The development team then works these fixes into the Scrum process
Important to note: The QA team does not need to have any coding skills, though they can be helpful. At the end of the day, QA’s number one goal is to pretend they’re users and mess things up.
Here’s a harsh reality when it comes to testing an app:
It’s REALLY hard.
Mobile app quality control is difficult, costly and time-consuming, and there is no one-size-fits-all solution. At many organizations (ours included) quality experts have the sole responsibility of testing mobile apps across multiple devices to uncover bugs and issues. We embrace a combination of manual testing and automated testing. It’s important to recognize that even after you spend hours testing an app, it’s possible that one or two bugs could still get past you—it happens to the best of us!
That’s why there are plenty of services that you can install prior to launch to help you monitor for bugs and respond to them quickly. Services like Crashlytics and Apteligent offer great resources for tracking issues once your app is live. In addition, you can use something like Runscope if your app is connected to third-party APIs that you want to ensure are always working with ease.
No matter how many services and automated tools you leverage during the quality control process, make sure the entire team (and maybe even some users) gives your app a test run before the launch. Not only can this experience expose bugs but it may also reveal UX issues you’ve overlooked.

Navigate this section
Plan your mobile app launch
You’ve put in the time, effort and funds to get your app to where it needs to be. Don’t lose momentum now—this is where you tie everything up with a nice little bow. Yes, it’s time to share your app with the world!
One of the biggest mistakes that brands and developers make is assuming that publishing to the app store will be enough to generate traction. It’s a common belief that once you’re live in the app store, thousands of people will automatically find your app and flood your bank account to say thank you for making their lives better.
Sorry to burst your bubble, but it doesn’t work that way.
In reality, you need a launch strategy to help generate awareness and sustain the hype for months to come.
Here’s a checklist to improve your chances of a successful launch:
1. Establish A Strategic Pricing Approach
Unlike traditional retail, monetization in the app store can follow different purchase formats.
This creates multiple app pricing strategies to consider.
You can make your mobile app free to download, offer paid premium features, use subscription pricing, charge for the initial download and/or offer in-app purchases. Each of these pricing models comes with pros and cons.
A lot of apps use free or freemium models to build their audience before making the official first sale.
For example, Spotify offers a premium tier for more listens, while Game of War users can buy packs of gold for a better gaming experience. The freemium model rewards both value-driven apps and scalability.
If you’re trying to launch an app that will reach millions of people, freemium pricing increases the likelihood of adoption. If you’re trying to connect with a niche audience to solve a serious pain, a download fee or subscription model might work best.
It all depends on your goal.
Before you just slap a $1.29 price tag on your app, consider the market. Ask questions that can guide you to a more strategic approach:
- How much are competitors’ apps charging? How much value does my app offer in comparison?
- How much money does it cost to keep the app running?
- How many downloads at what price point would I need to cover those fees?
- Are there features I could offer as an upsell or upgrade?
2. Develop Branded Screenshots & Visuals For Marketing Purposes
You’ll need to make sure you have beautiful screenshots and brand visuals to promote your mobile app, just like Picniic has done here:
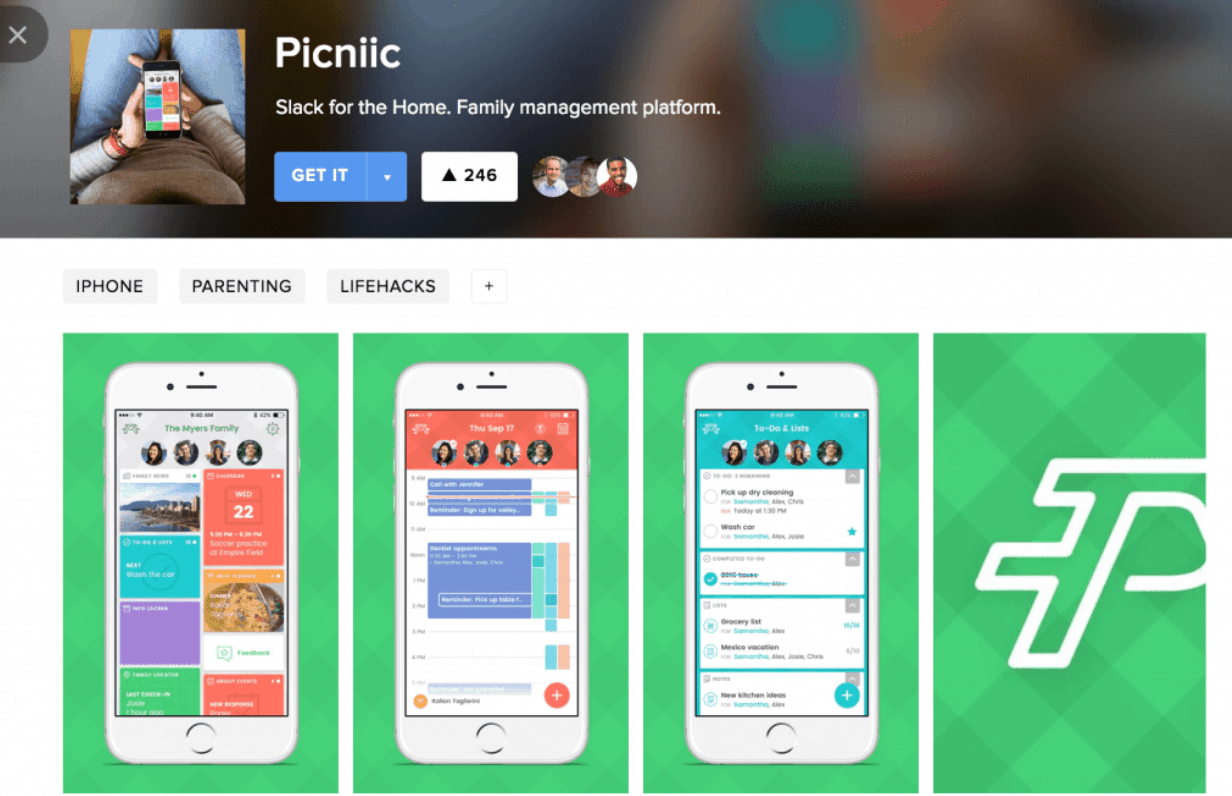
Whether you’re sending out press releases, posting on social media or uploading screenshots to Product Hunt, visual assets help tell the story. It’s also a good idea to upload the visuals to a Dropbox folder you can share with the press. Make it easy for people to write about you.
(More on visuals and their importance in the app store below.)
3. Get Early Testimonials for Your App Store Description
There’s no such thing as too much trust.
Take these quotes from the Headspace app description:

Testimonials from Emma Watson and the New York Times are gold.
You want people to trust that your app is going to deliver value. Reviews are a major part of the trust puzzle, but testimonials can also play a role in recruiting users.
The way we see it, most users won’t read your app description, but those who do are likely to become your most vocal advocates or detractors. Start the relationship on a high note by offering testimonials from people who have tested your app and like what you’ve built!
You can also use these testimonials when reaching out to the press.
4. Develop An Outreach Strategy
Here’s where most app launches fall flat:
Mobile app developers fall victim to believing that they’re building the Field of Dreams.
Reality check: Just because you build it doesn’t mean users will come.
You need to have a strategy in place to help drive app awareness and initial hype.
The first step to building a quality media strategy is identifying what makes your product unique and encapsulating its value. Then it’s time to start reaching out and building relationships with journalists and bloggers who speak to your target audience.
How can you find these people? Here are a few tips:
- Google News: Search Google News for apps that compete with you and look at the names of the reporters covering them.
- Reverse Google Image search: Use images from your competitors’ websites to find bloggers who’ve written about their apps. These bloggers might be interested in what you’ve built too.
- HARO: Help A Reporter Out is a daily email that connects journalists with experts in various fields. Sign up for opportunities to connect with writers when a topic aligns with your app.
In addition to media members, you should initiate contact with someone at Apple prior to your launch to increase the likelihood of having your app featured. There’s no guarantee you’ll be featured, but it helps.
5. Launch An Initial Web Presence
Want to make sure people find out about your mobile app?
Start promoting it before it’s live.
Create a landing page that captures emails by using a site like Launchrock, downloading a theme from ThemeForest or building a landing page from scratch.
There are four key elements to a great app website:
- You have a way to capture emails
- The value of the app is clearly communicated
- It’s easy for the press to navigate and find content
- You have a customer support email for the future
The primary goal of your website should be to capture emails so that when you launch, you can drive downloads and reviews as soon as possible.
6. Make It Easy To Spread The Word
Great mobile apps don’t go viral because of algorithms.
Great mobile apps go viral because people can’t stop talking about them.
Prior to launch, you want to build relationships not only with the media but also with your target audience. You can do this by being active in various forums, Facebook groups or blogs.
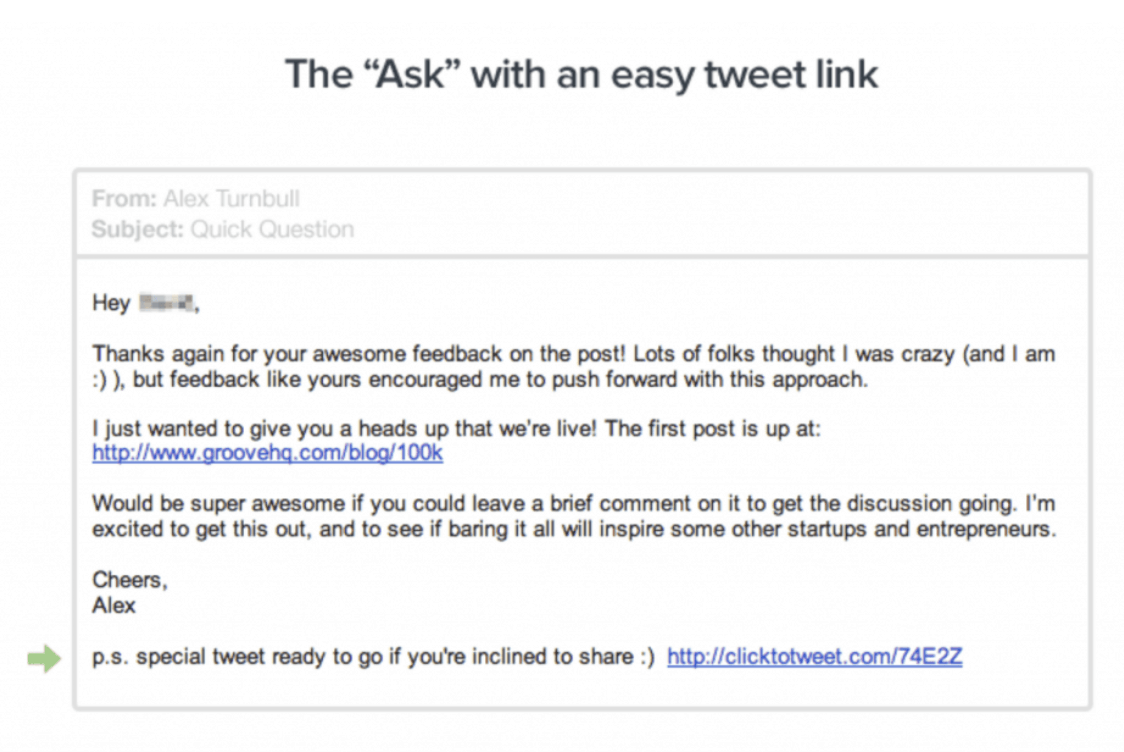
You can also do manual outreach.
Alex Turnbull, CEO of Groove, was able to generate thousands of subscribers using this approach. He used a simple checklist for building relationships with influencers prior to asking them to share his content:
- Follow on Twitter
- Two tweets
- Two blog comments
- Two blog shares
- Personal email
Once those things were done, he followed up with the perfect email:
7. Install The Proper Analytics
Venerable business and management guru Peter Drucker is credited with saying:
“What’s measured improves.”
If you have dreams of growth for your mobile app, it’s important to install the appropriate analytics software before you launch. You need to have the tools in place that will show you when things are moving in the right direction…and when they’re not. You should have systems in place that will allow you to measure the things that matter most, from metrics like churn and engagement to business goals like downloads and revenue.
Setting yourself up for five-star reviews
You’ve built your dream app, and the pre-launch hype is off the charts! It’s now live in the Apple App Store and Google Play, and you’re just waiting for those five-star reviews to start rolling in…
…but they’re not.
So what happens now? How do you keep the hype going?
A five star-rating for your mobile app is very important for long-term audience building and retention. For your app to reach its full potential as well as a wider audience, your work is really just beginning.
Google and Apple want people to download great apps. The review and rating system is their way of giving users a chance to size up an app before downloading it. In some of the most competitive app markets, a handful of negative reviews are enough to tank an app’s download numbers.
We’ve built plenty of apps that have generated five-star ratings and won awards. The opportunity to study the habits and strategies of other successful makers has helped us uncover some powerful tactics for generating and sustaining positive reviews.
This infographic will quickly show you our proven in-app tactics, how to prevent that post-launch cool-off, and how to increase your positive reviews:
INFOGRAPHIC: [https://mindsea.com/five-star-app/]
Optimize for the app store
You’ve launched your app, but your work is not done. Your app is no good if no one knows it exists. In this section, we run through the steps you need to take to ensure your app thrives on the market and gets the exposure it deserves.
With millions of apps available in both app stores, your app has stiff competition. Thankfully, there’s a process called app store optimization (ASO), which means fine-tuning your app listing to help your audience find you.
What Is App Store Optimization & Why Is It Important?
In recent years, more and more iOS app developers and Android app developers have realized that ASO is no longer a hidden gem but instead a necessary step in marketing an app. With ASO, you can target specific users, get to the top of relevant user searches, and rank for relevant high-volume keywords.
It’s believed that Apple and Google use very similar algorithms to determine rankings. From our research and experience, we’ve found that the following elements (in no particular order) tend to be the most important for ranking well:
- Keyword usage in the name and description
- Visuals and branding
- Number of downloads
- Number of positive reviews
To attract quality users, follow this three-step ASO checklist to ensure your app gets the visibility it needs.
1. Understand Your Keywords
Understanding your audience is the most critical step in the entire ASO process. Start by asking yourself a few questions: How do users conduct their searches? What types of words or phrases do they use to find apps? Users tend to search in two- to three-word, feature-based phrases.
Keep in mind: In the Apple App Store, you’re limited to a 100-character keyword bank. (The Google Play Store doesn’t make you declare your keywords.) Narrow down your targeted keywords to the ones that are most relevant to your app.
2. Optimize Your App Title and Description
The app title is the very first thing that users will see. It needs to be catchy, unique and relevant to the app and its core features.
It’s also important to include keywords. According to MobileDevHQ, keywords in the app name have the biggest impact on app store search rankings. In fact, a study by the company found that putting keywords in the title led to a 10.3% increase in an app’s likelihood of ranking. That’s huge.
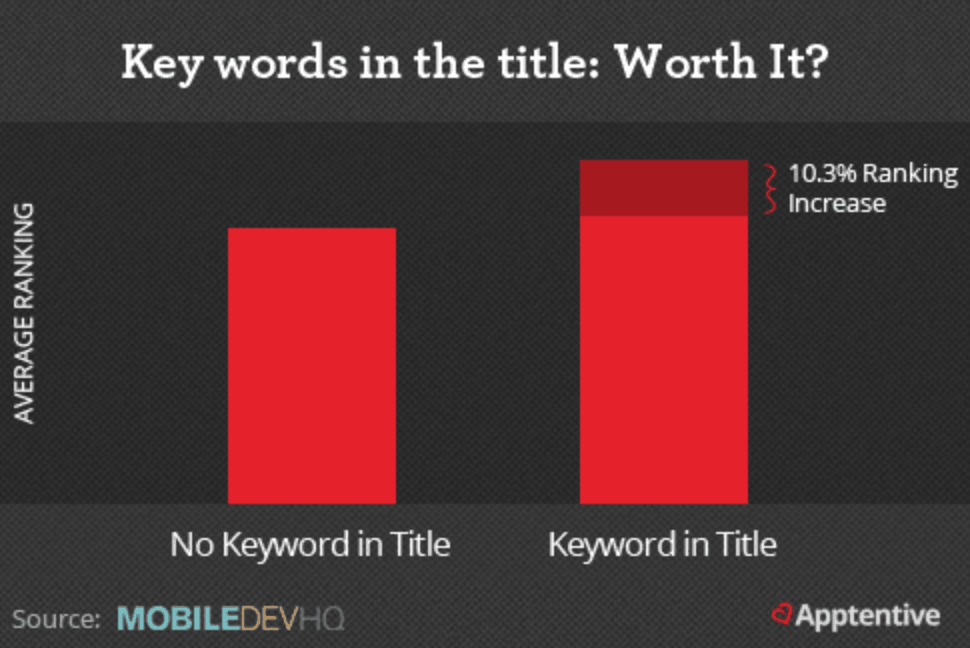
But it doesn’t mean you should keyword-stuff your titles—not to mention that app names are limited to 50 characters. So when you’re thinking about what to name your mobile app, pinpoint one or two words that are likely to be used as search terms by potential users and include those words in your headline.
Here are a few examples from the Apple App Store:
- Calm: Sleep, Meditate, Relax
- Headspace: Meditation & Sleep
- VSCO: Photo & Video Editor
Notice a pattern?
They follow a consistent format:
[Product name]: [Description with keywords]
The app description, which is limited to 4,000 characters, should also emphasize the app’s core features with relevant keywords. By doing so, you can build relevancy for these high-volume keywords and increase your app’s visibility.
3. Create Engaging Screenshots & a Preview Video
The three apps listed above have also capitalized on visuals and branding. Take a look:
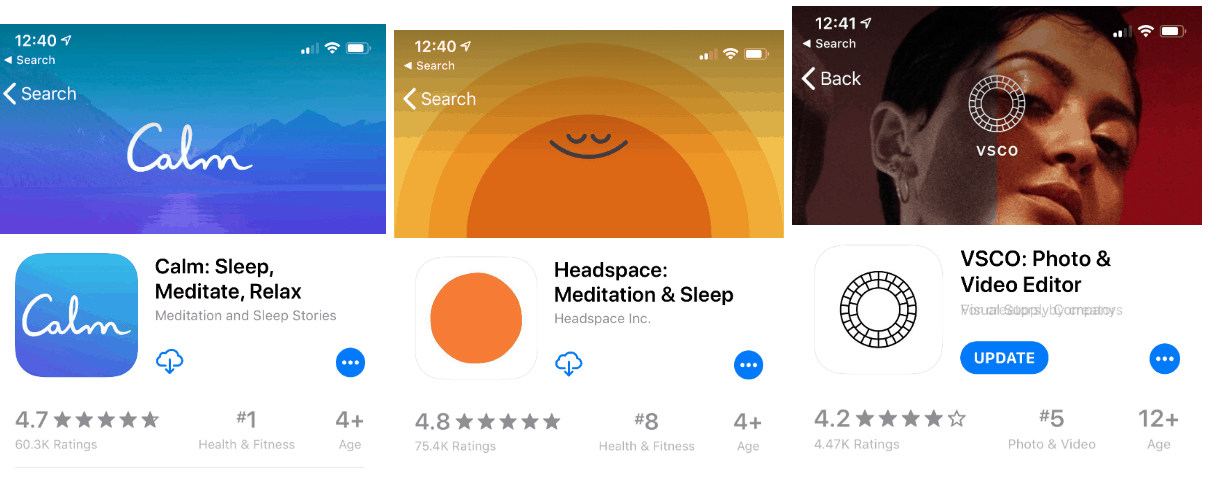
When browsing the app store, users make snap judgments about apps based on visuals—there’s a reason these apps have risen to the top. The visuals immediately have an emotional impact and sway our likelihood of downloading these apps.
Engaging visuals are a vital part of the acquisition funnel—they help convert users for the keywords you’re targeting. The screenshots and preview video need to highlight the functionality and interface of the app in order to give potential users a clear picture of what the app will look like if they download it.
Pay attention to user trends and behavior, along with how competitors are positioning their apps. You can make your visuals stand out by:
- Using brand colors optimized for success
- Displaying in-app/character art
- Using readable fonts
- Including a call-to-action to increase conversion rates
ASO is a crucial step developers need to take in user acquisition. By implementing these three steps, you can convert browsers into users—and you can save thousands of dollars that you might otherwise spend on ineffective marketing ventures while converting more users in the long run.
The above section includes contributions from Dave Bell.
Dave Bell is the Co-Founder and Chief Executive Officer of Gummicube. In this role, Dave is responsible for overseeing the business strategy for the company, driving growth and market development. Dave is a pioneer of the mobile entertainment industry with more than 15 years of experience publishing, marketing and distributing mobile applications and games across carrier, direct to consumer and app store channels.
Give your mobile app regular ASO health checks
If your app downloads have flatlined, don’t panic.
Maybe your app has been sitting in the Apple App Store or Google Play Store for a while, and growth is stagnating. What can you do about it?
A mobile app, much like the human body, needs regular fixing and fine-tuning. There’s always room for improvement; in fact, you should be actively looking for ways to improve your app: updating it with the latest software, adding new features, fixing bugs, etc. And you should always be exploring strategies to expand your user base.
That bring us to the ASO (app store optimization) health check.
1. Reconfirm Your Keywords
Understanding how your target audience conducts a search is the first step toward making your app visible in the app store.
Even if you did some keyword research when you first launched the app, it’s likely your users’ needs have evolved and they’re searching for terms that you haven’t leveraged yet.
Keep in mind: The words you associate with your app may not be the same ones your target audience is actually searching for. You have to do your research to make sure that the problems your audience is trying to solve and the features they’re looking for are incorporated into your keywords.
Having the right keywords and placing them correctly—in the title, subtitle, description (for the Google Play Store) and/or keyword bank (for the Apple App Store)—is crucial to getting more eyes (and the right eyes) on your app.
2. Update Your App Icon
Have you considered that your branding may be in need of a refresh?
It’s OK to admit that your app icon is outdated—you’d be in good company. Many well-known brands have redesigned their icons over the years, and some do it fairly regularly:
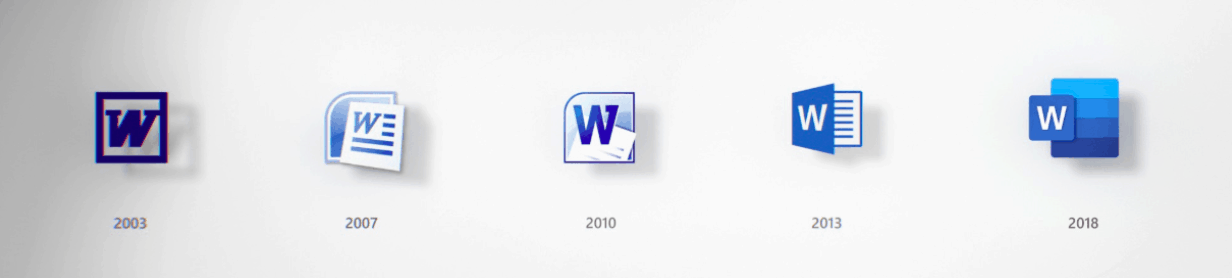
A design update could be as simple as bolder colors and cleaner lines, or it could mean a complete rebranding. In that case, approach the rebranding process with clarity of vision and focus, which only comes through testing and research. Many businesses, from startups to global corporations, go through rebranding. Some do it right; others, not so much… Don’t be one of those.
3. Upload New Screenshots
First impressions count.
Screenshots act like insurance of sorts. They give potential customers a taste of what using the app will be like without the commitment of downloading. But screenshots need constant updating.
This is especially important if you’ve recently updated your app’s interface. New features, bolder colors, better branding—all of these changes warrant updated product images.
Looking for some inspiration? These 13 app product shots immediately caught our attention.
4. Incorporate A Video Preview
Photos are nice, but this year it’s all about video.
Videos can tell a story in a way that photos can’t. They’re attention-grabbing, engaging and fun—and using video in your app store listing is one way to stand out from the crowd.
If you didn’t offer a video preview when you first launched in the app store, now’s the time to give your audience a more dynamic glimpse of the user experience.
Use your 30 seconds wisely: Hook the user right away with beautiful graphics, clearly articulate the purpose and benefits of your app, and end with a call to action.
Here’s a great example from the Movies Anywhere app:
VIDEO: [https://www.youtube.com/watch?v=YYNUdP8n324]
Using bold graphics and familiar images, the video succinctly states what the app is about and ends with a persuasive reason to download it. (It’s free!)
5. Get Your Current Users To Leave Reviews
Reviews are one of the best ways to drive traffic to your app.
A built-in system for encouraging users to leave ratings and reviews should be a priority for your next app update. Why? Having a higher rating (four stars and above) will improve your app’s visibility and leave a positive impression on people browsing the app store.
Simple as that.
While you’re bound to get a few negative reviews, encouraging and embracing even the bad reviews already places you above the competition. Those who have nothing to hide, hide nothing, and you can use that constructive feedback to make the app better—your users will appreciate that.
6. Add Value Within The App
You probably update your app frequently. But if those updates are all bug fixes, and you haven’t given your users something new to log in for, chances are you have bigger things to worry about than attracting new users—namely, retaining your existing ones!
The last thing you want is for once-loyal users to get a sour taste in their mouth and leave you for a competitor (and maybe leave negative reviews behind).
Remember: There’s always somebody trying to come up with something bigger and better. So do yourself a favor and keep your app fresh with new features, expanded options, improved navigation, etc. You want to speak to people today, not people back in 2017.
A little bit of effort and innovation will keep your users loyal and help reel new folks in!
Now over to you
Allllrighty then! (cue Ace Ventura)
You now know ALL the steps involved in bringing an app to life from idea to launch; now it’s up to you to get to work! 🚀
To recap, the 9 steps involved in building a mobile app are as follows:
- Finding an idea worth pursuing
- Decide who will build your app
- Create a mobile app strategy
- Plan your mobile app UX & user journey
- Build your product roadmap
- Start pitching investors or internal executives
- Build your mobile app
- Plan your mobile app launch
- Optimize for the app store
If you’re interested in learning more about the app-building process or want some help building a successful app, reach out and chat with one of our product strategists—we’d love to talk about turning your idea into a reality.